Edit an inventory record
Every IT item in your organization can be listed and tracked in Inventory Management. This is done through individual inventory records. Each inventory record is a detailed collection of information about the item.
To open an inventory record:
- Click on entry. The Inventory Record opens.
- Click on the tabs to open the information in the details pane on the right.
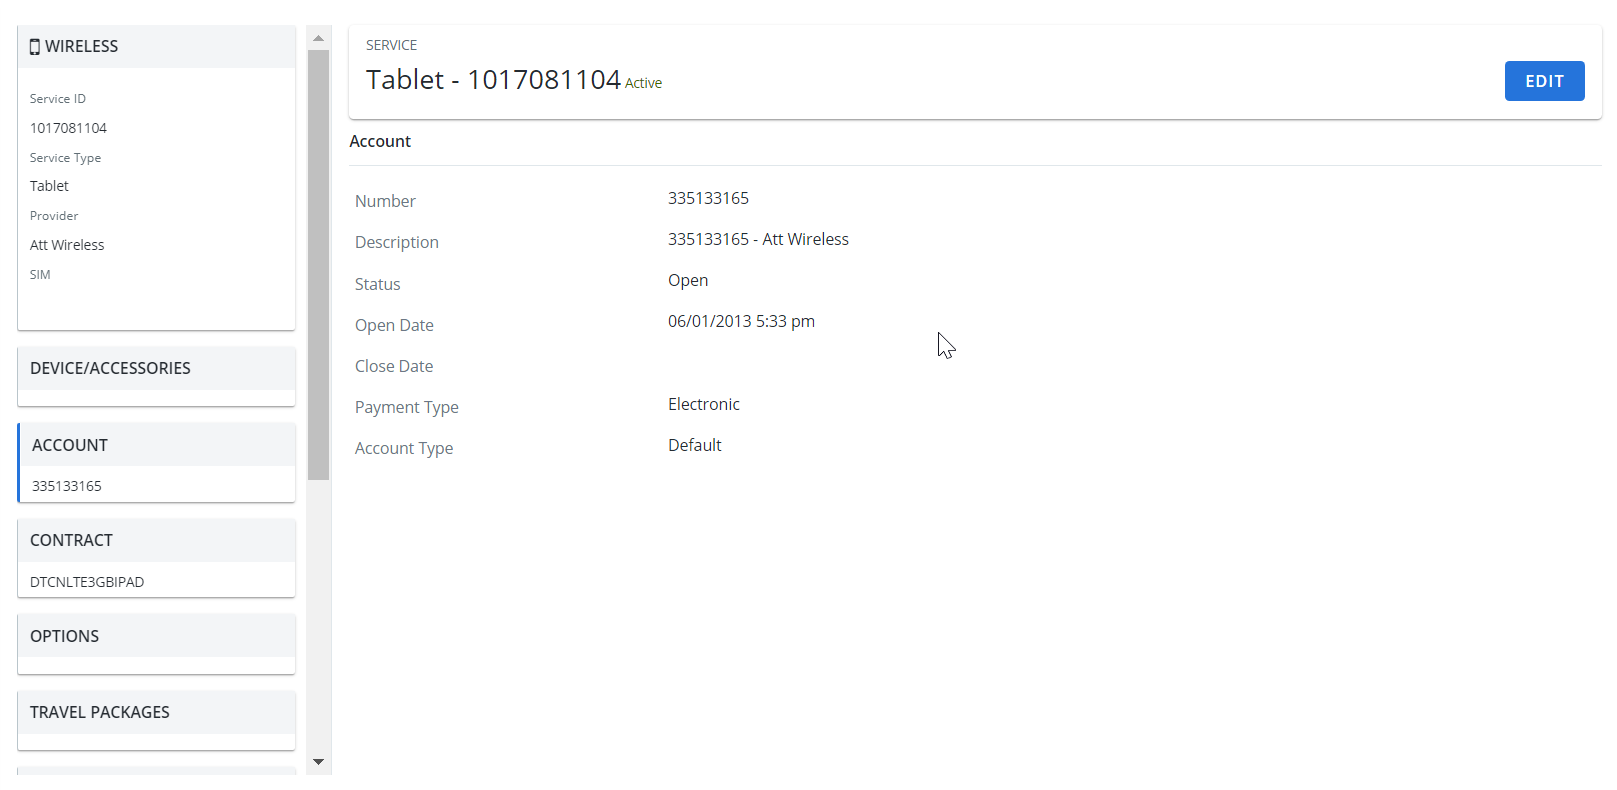
An example of an inventory record. Click to enlarge.
Edit an inventory record:
Caution: Any time an inventory item is added, or an existing item is modified, the changes must be saved within 24 hours, otherwise they are erased. To make sure that changes are not erased, it's best to save changes immediately or shortly after making them.
- Click on the inventory record entry from the inventory grid. The inventory record opens.
- Click Edit.
- Select the tab from the left hand panel you want to edit as follows:
- Service Details:
- Modify the item's number, service type and provider, and SIM number.
- Click Apply.
- Status: click Suspend or Activate.
- Device/Accessories:
- Click + Add Device/Accessories to add devices or accessories.
- Click the pencil icon to edit existing devices or accessories.
- Click the X to delete a device or accessory.
- Account:
- Click the pencil icon to edit the account associated with the inventory item.
- From the list of available accounts that opens, select an account to associate with the inventory item. The selection is saved automatically.
- Contract:
- Click the pencil icon to change the contract associated with the inventory item
- From the list of available contracts opens, select a contract. The selection is saved automatically.
- Options:
- Click + Add Option to add an option.
- Click the pencil icon to edit an existing option.
- Assignment:
- Click the + to assign an employee.
- Click the pencil icon to edit an existing assignment.
- Click Set As Primary beside an employee entry to change the primary assignment to them.
- Address:
- Select one of the Address Assignments: None, Employee, Department or Other Company Address.
- For Other Company Address, click + and select another address.
- Click Apply.
- Used for:
- Click + to add a Used For entry.
- Click the pencil icon to edit an existing entry.
- Rules:
- Click + to add a rule. A drop down menu appears.
- Select a Rule.
- Click the X to delete a Rule.
- Relations:
- Click Add Internal Service to relate an internal service.
- Click Add External Service to relate an external service.
- Click X to remove a relation.
- Additional Information:
- Enter the activation date of the inventory item in the text box.
- Add information for any Additional Attributes.
- Comments:
- Enter comments in the text box.
- Click Apply.
- Service Details:
- Click Execute.
- Select one of the following:
- Add to a New Workorder
- Add to an Existing Workorder
Update Inventory Only
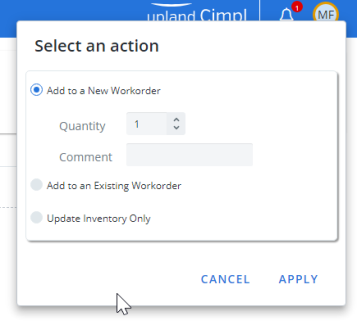
Note: If you chose either of the workorder options from the Execute menu, the confirmation message asks you whether you want to be taken to the associated workorder. Click OK to navigate to the Workorder Center. Click Cancel to remain in the Inventory Management Section.
- Click Apply. The inventory record is updated.
Note: The actions available in the Execute button can be modified by changing particular permissions from the Configuration Module. The permissions Add to existing workorder and Add to new workorder allow users to add their inventory changes to existing and new workorders. When these two permissions are not selected, users will see their inventory edits automatically executed upon clicking the Execute button from an inventory entry.
Make sure your items are saved
Any time an inventory item is added, or an existing item is modified, the changes must be saved within 24 hours, otherwise they are erased. This is done automatically by Cimpl. To ensure that changes do not end up erased, it's best to save changes immediately or shortly after making them.
Unsaved items have an exclamation mark in the inventory:

- Open the inventory item.
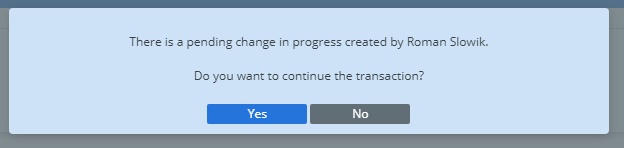
- Click Edit. A message opens.
-
Click Yes to continue the transaction.
- To save the changes, click Execute.
- Select Update Inventory Only.
- Click Apply.